LED 제어 배선
DHT-11 온습도 센서
Pi4J를 위한 디렉토리를 만들고, 이곳에 Pi4J를 다운로드 합니다.
pi@raspberrypi:~$ mkdir pi4j
pi@raspberrypi:~$ cd pi4j
pi@raspberrypi:~/pi4j$ wget http://get.pi4j.com/download/pi4j-1.2.zip
zip 파일을 푼다.
pi@raspberrypi:~/pi4j$ unzip pi4j-1.2.zipraspberry-java-led 예제 다운로드
pi@raspberrypi:~ $ git clone https://github.com/kwanulee/raspberry-java-led.git예제 컴파일 및 실행하기
pi@raspberrypi:~ $ cd raspberry-java-led
pi@raspberrypi:~/raspberry-java-led $ make
pi@raspberrypi:~/raspberry-java-led $ make run/**
* The class LedControl controls the LED connected to GPIO01 of the Raspberry Pi board.
* This code turns the LED on and off in every one second
*
* @author Kwanwoo Lee
* @version 1.0
*/
import com.pi4j.io.gpio.*;
public class LedControl
{
public static void main(String[] args) throws InterruptedException {
// create an instance of GpioController
final GpioController gpio = GpioFactory.getInstance();
// set the GPIO_05 as an OUTPUT pin and initialize it as a LOW value
final GpioPinDigitalOutput pin = gpio.provisionDigitalOutputPin(RaspiPin.GPIO_05, PinState.LOW);
System.out.println("Starting:");
while(true) {
Thread.sleep(1000);
pin.high(); // write high value to the GPIO_01 pin
Thread.sleep(1000);
pin.low(); // write low value to the GPIO_01 pin
}
}
} Makefile
############################################
# This is a project standard makefile..
############################################
JAVAC = javac
JAVA = java

###########################################
# FLAGs
###########################################
OUTDIR = out
JFLAGS = -g
JDPATH = -d $(OUTDIR)

JCPATH = -classpath $(OUTDIR):./lib/*

###########################################
# Compile
###########################################
.SUFFIXES: .java .class

.java.class:
    $(JAVAC) $(JFLAGS) $(JCPATH) $(JDPATH) $*.java

###########################################
# SOURCE TREE macro
###########################################
JAVA_SOURCE = \
    ./LedControl.java \

###########################################
# BUILD
###########################################
default: classes
classes: $(JAVA_SOURCE:.java=.class)

###########################################
# Util
# RM is a predefined macro in make (RM = rm -f)
###########################################
clean:
    $(RM) *.class

run:
$(JAVA) $(JCPATH) LedControlAdafruit's DHT Sensor 라이브러리 설치
pi@raspberrypi:~$ git clone https://github.com/adafruit/Adafruit_Python_DHT.git
pi@raspberrypi:~$ cd Adafruit_Python_DHT/
pi@raspberrypi:~/Adafruit_Python_DHT$ sudo apt-get update
pi@raspberrypi:~/Adafruit_Python_DHT$ sudo apt-get install build-essential python-dev
pi@raspberrypi:~/Adafruit_Python_DHT$ sudo python setup.py install
설치 확인
pi@raspberrypi:~/Adafruit_Python_DHT$ cd examples
pi@raspberrypi:~/Adafruit_Python_DHT/examples$ sudo ./AdafruitDHT.py 11 4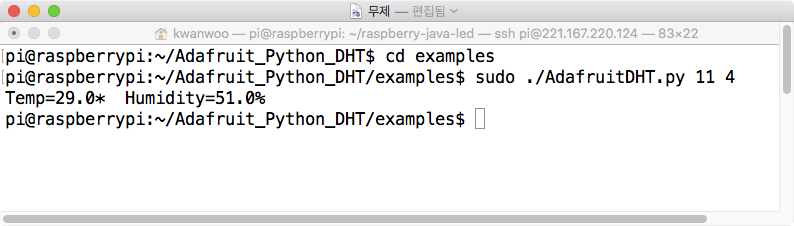
import sys

import Adafruit_DHT

# Parse command line parameters.
sensor_args = { '11': Adafruit_DHT.DHT11,
                '22': Adafruit_DHT.DHT22,
                '2302': Adafruit_DHT.AM2302 }
if len(sys.argv) == 3 and sys.argv[1] in sensor_args:
    sensor = sensor_args[sys.argv[1]]
    pin = sys.argv[2]
else:
    print('Usage: sudo ./Adafruit_DHT.py [11|22|2302] <GPIO pin number>')
    print('Example: sudo ./Adafruit_DHT.py 2302 4 - Read from an AM2302 connected to GPIO pin #4')
    sys.exit(1)

# Try to grab a sensor reading.  Use the read_retry method which will retry up
# to 15 times to get a sensor reading (waiting 2 seconds between each retry).
humidity, temperature = Adafruit_DHT.read_retry(sensor, pin)

# Note that sometimes you won't get a reading and
# the results will be null (because Linux can't
# guarantee the timing of calls to read the sensor).
# If this happens try again!
if humidity is not None and temperature is not None:
    print('Temp={0:0.1f}*  Humidity={1:0.1f}%'.format(temperature, humidity))
else:
    print('Failed to get reading. Try again!')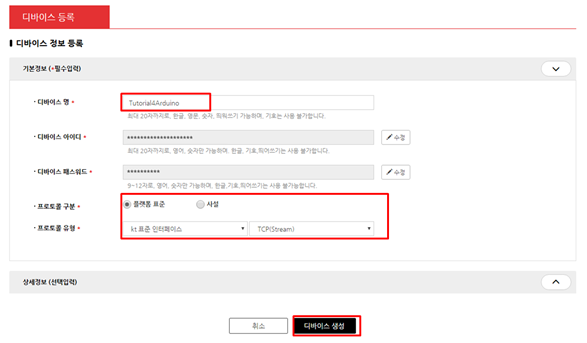
sys.exit(1)IoTMakers에 접속해서 디바이스를 등록한다. 처음 가입하면 다음과 같이 디바이스 등록 화면을 볼 수 있다.

디바이스 명을 입력하고 프로토콜 유형을 선택한다.
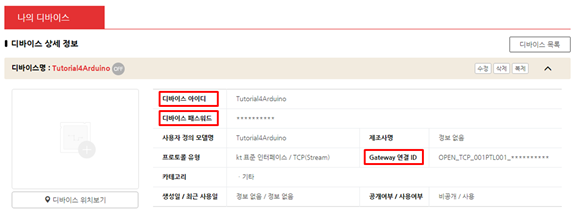
디바이스 연결 상태: OFF 확인

디바이스 상세 정보를 미리 확인해 둔다.
IoTMakers에서 앞서 등록한 디바이스에 LED on/off를 위한 제어태그를 등록한다.
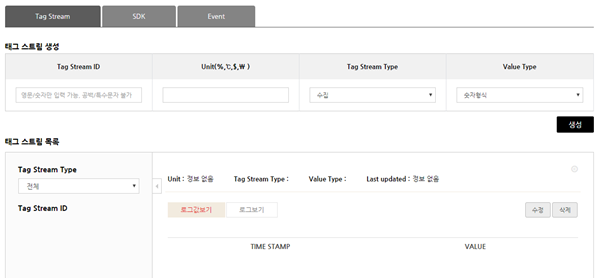
IoTMakers에서 앞서 등록한 디바이스에 온도수집을 위한 수집태그를 등록한다.

IoTMaker-raspberry 예제 다운로드
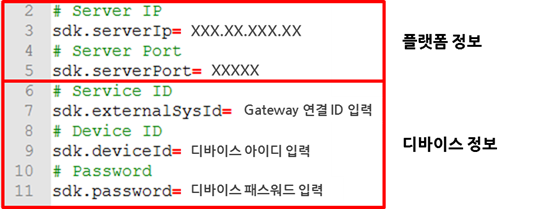
pi@raspberrypi:~$ git clone https://github.com/kwanulee/IoTMakers-raspberry.gitIoTSDK.properties 파일을 열어 아래와 같이 수정한다.
pi@raspberrypi:~$ cd IoTMakers-raspberry
pi@raspberrypi:~$ nano IoTSDK.properties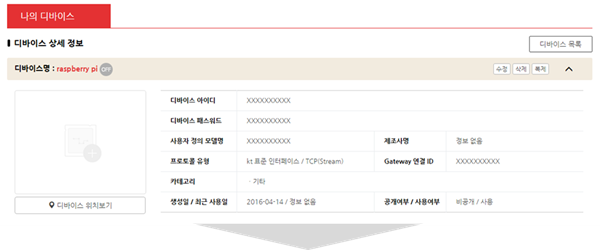
예제 컴파일 및 실행하기
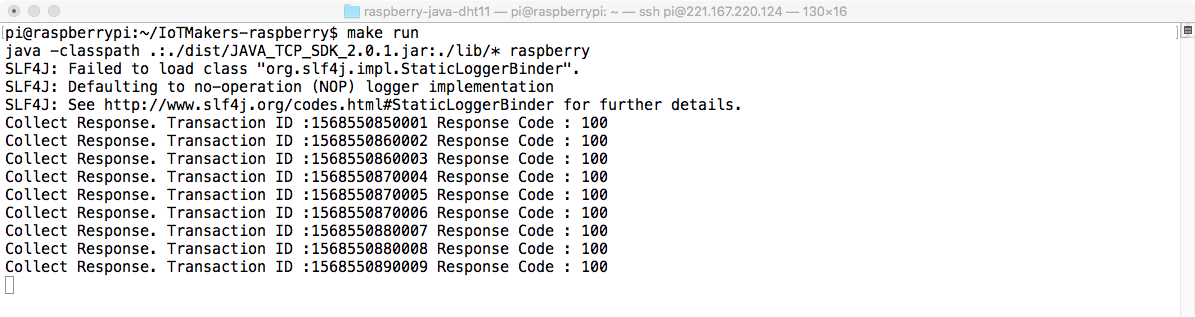
pi@raspberrypi:~/IoTMakers-raspberry$ make
pi@raspberrypi:~/IoTMakers-raspberry$ make run