Configure Component 대화창에서 아래와 같이 설정후, Finish 버튼을 클릭
- Fragment Name 값을 DetailsFragement로 설정
- Fragment Layout Name 값을 fragment_details로 설정
- Include fragment factory method? 체크함
fragment_details.xml 파일을 열고, TextView 위젯을 포함한 레이아웃 정의
<LinearLayout xmlns:android="http://schemas.android.com/apk/res/android"
    xmlns:tools="http://schemas.android.com/tools"
    android:layout_width="match_parent"
    android:layout_height="match_parent"
    android:padding="5dp"
    >

    <ScrollView
        android:layout_width="match_parent"
        android:layout_height="match_parent">
        <TextView
            android:layout_width="match_parent"
            android:layout_height="match_parent"
            android:text="@string/hello_blank_fragment"
            android:id="@+id/textview"/>
    </ScrollView>
</LinearLayout>
DetailsFragment.java
- mIndex 멤버 변수 선언
- TitlesFragment의 목록에서 선택된 항목 번호를 저장하기 위한 변수로서, 이 변수의 값은 onCreate() 콜백 메소드에 수행 시에 DetailsFragment 객체로 전달된 인자 값으로 초기화됩니다.
- public static DetailsFragment newInstance(int index) 정의
- DetailsFragment 객체를 생성시키는 팩토리 메소드로서, index 값을 인자로 DetailsFragement 객체에 전달한다.
- onCreateView() 메소드 재정의
- 이 프래그먼트와 관련된 View 객체를 반환해야 합니다.
- 이 프래그먼트의 뷰를 정의한 레이아웃 리소스가 fragment_details 이므로, 이 리소스로부터 뷰 객체를 얻어오고, 이 뷰 객체 내에 포함된 텍스트 뷰 객체에 TitlesFragment의 목록에서 선택된 항목 번호에 대응되는 상세정보를 표시합니다.
public class DetailsFragment extends Fragment {
    // the fragment initialization parameters, e.g. ARG_ITEM_NUMBER
    private static final String ARG_PARAM1 = "index";
    private int mIndex;

    public DetailsFragment() {
        // Required empty public constructor
    }

    /**
     * Use this factory method to create a new instance of
     * this fragment using the provided parameters.
     *
     * @param index selected position in the ListView.
     * @return A new instance of fragment DetailsFragment.
     */
    public static DetailsFragment newInstance(int index) {
        DetailsFragment fragment = new DetailsFragment();
        Bundle args = new Bundle();
        args.putInt(ARG_PARAM1, index);
        fragment.setArguments(args);
        return fragment;
    }

    @Override
    public void onCreate(Bundle savedInstanceState) {
        super.onCreate(savedInstanceState);
        if (getArguments() != null) {
            mIndex = getArguments().getInt(ARG_PARAM1);
        }
    }

    @Override
    public View onCreateView(LayoutInflater inflater, ViewGroup container,
                             Bundle savedInstanceState) {
        // Inflate the layout for this fragment
        View view = inflater.inflate(R.layout.fragment_details, container, false);
        TextView tv = (TextView)view.findViewById(R.id.textview);

        if (mIndex >=0)
            tv.setText(Shakespeare.DIALOGUE[mIndex]);

        return view;
    }
}
MainActivity.java
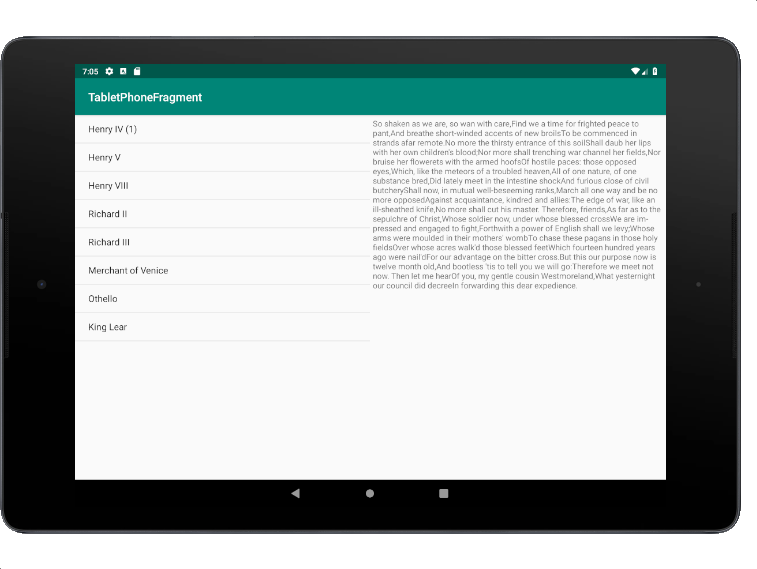
- onTitleSelected() 메소드에서 파라미터로 전달받은 항목 선택 번호를 새롭게 생성된 DetailsFragment 객체에게 setSelection() 메소드를 통해 전달
- 새롭게 설정된 DetailsFragment 객체를 동적으로 교체
public class MainActivity extends AppCompatActivity
                        implements TitlesFragment.OnTitleSelectedListener{

    //... 기존과 동일

    public void onTitleSelected(int i) {
        //Toast.makeText(getApplicationContext(),"position="+i,Toast.LENGTH_SHORT).show();
        DetailsFragment detailsFragment = DetailsFragment.newInstance(i);
        getSupportFragmentManager().beginTransaction().replace(R.id.details, detailsFragment).commit();
    }
}
실행결과