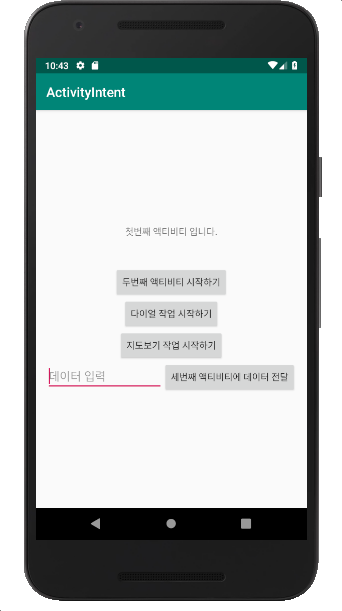


기존 activity_first.xml의 지도보기 작업 시작하기
버튼 위젯 아래에 다음과 같은 뷰를 추가한다.
<?xml version="1.0" encoding="utf-8"?>
<LinearLayout ...>

        <TextView
                ... />

        <Button
                android:text="두번째 액티비티 시작하기"
                ... />
        <Button
                android:text="다이얼 작업 시작하기"
                ... />
        <Button
                android:text="지도보기 작업 시작하기"
                ... />

        <!-- 추가된 뷰(시작) -->
        <LinearLayout
            android:layout_width="match_parent"
            android:layout_height="wrap_content"
            android:orientation="horizontal">
            <EditText
                android:layout_width="wrap_content"
                android:layout_height="wrap_content"
                android:id="@+id/edit_data"
                android:layout_weight="1"
                android:hint="데이터 입력"/>
            <Button
                android:layout_width="wrap_content"
                android:layout_height="wrap_content"
                android:text="세번째 액티비티에 데이터 전달"
                android:id="@+id/buttonThirdActivity"/>
        </LinearLayout>
        <!-- 추가된 뷰(끝)-->
</LinearLayout>
FirstActivity 클래스에서 다음 코드를 추가하시오
세번째 액티비티에 데이터 전달버튼이 클릭 되었을 때,
dataFromFirstActivity로 지정)
public class FirstActivity extends AppCompatActivity {

    @Override
    protected void onCreate(Bundle savedInstanceState) {
        //...(연습 4까지 진행된 코드)

        // 연습 4까지 진행된 코드 이후에 추가된 코드
        btn = findViewById(R.id.buttonThirdActivity);
        btn.setOnClickListener(new View.OnClickListener(){

            @Override
            public void onClick(View v) {
                Intent intent = new Intent(getApplicationContext(), ThirdActivity.class);

                EditText edit = findViewById(R.id.edit_data);
                intent.putExtra("dataFromFirstActivity", edit.getText().toString());

                startActivity(intent);
            }
        });
    }
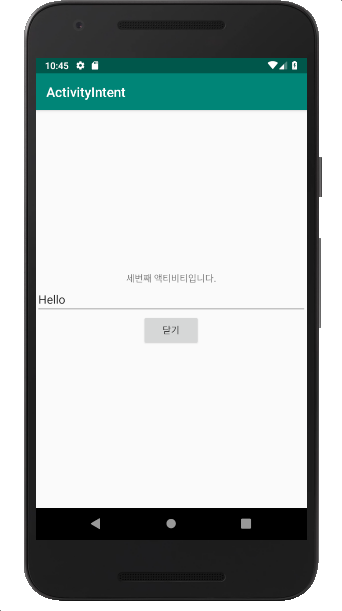
ThirdActivity에서 사용할 레이아웃 파일 activity_third.xml을 다음과 같이 작성
<?xml version="1.0" encoding="utf-8"?>
<LinearLayout xmlns:android="http://schemas.android.com/apk/res/android"
    xmlns:tools="http://schemas.android.com/tools"
    android:layout_width="match_parent"
    android:layout_height="match_parent"
    android:orientation="vertical">

    <TextView
        android:layout_width="wrap_content"
        android:layout_height="wrap_content"
        android:text="세번째 액티비티입니다."
        android:id="@+id/textView2" />

    <EditText
        android:layout_width="match_parent"
        android:layout_height="wrap_content"
        android:id="@+id/editText"
        android:inputType="text"
        />
    <Button
        android:layout_width="wrap_content"
        android:layout_height="wrap_content"
        android:text="닫기"
        android:id="@+id/buttonThirdActivity"/>
</LinearLayout>
ThirdActivity 클래스의 onCreate() 메소드에서 다음 코드를 추가한다.
public class ThirdActivity extends AppCompatActivity {

    @Override
    protected void onCreate(Bundle savedInstanceState) {
        super.onCreate(savedInstanceState);
        setContentView(R.layout.activity_third);

        Intent intent = getIntent();
        String msg = intent.getStringExtra("dataFromFirstActivity");
        EditText et = (EditText)findViewById(R.id.editText);
        et.setText(msg);

        Button btn = findViewById(R.id.buttonThirdActivity);
        btn.setOnClickListener(new View.OnClickListener() {
            @Override
            public void onClick(View view) {
                finish();
            }
    });
    }
}
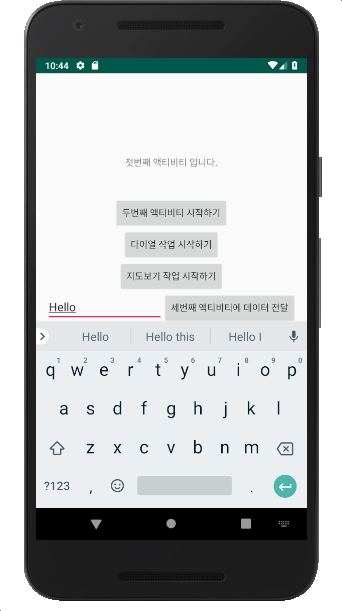
실행결과
| 초기 실행 화면 | 데이터 입력 | 버튼 클릭 후 |
|---|---|---|
 |
 |
 |